How to Import or Upload Data in CRM as a Service
- Marc (TeamsWork)

- 18 sept. 2024
- 4 min de lecture
Dernière mise à jour : 13 avr.
In sales, your focus should be on winning deals, not getting bogged down by tedious data administration. To streamline this process, we’ve developed an intuitive data upload feature that allows you to easily import your data into Microsoft Teams CRM. This functionality helps you eliminate manual data entry, saving time and enabling your team to concentrate on what really matters—closing deals.
This feature allows you to import your data from Excel or CSV files. Once your data is uploaded, it is instantly available in CRM as a Service.
In this step-by-step guide, we'll show you how to upload your Leads, Contacts and Organizations into CRM as a Service. You can upload your Opportunities in similar way.
How to Upload Your Data in CRM as a Service

1. Prepare Your Data
Ensure your Customers information is structured correctly in your Excel / CSV file, a maximum size of 25 MB, with columns clearly labelled for each data point (e.g., name, email, phone number, company name, etc.). This helps the system map the fields properly.
Few additional advice in your data preparation:
Remove Duplicates
Identify and eliminate duplicate records, such as repeated leads or contacts, to avoid confusion and redundancy in your CRM system.
Correct Incomplete or Inaccurate Data
Fill in missing fields where possible, and verify the accuracy of essential information like contact names, email addresses, and company names.
Remove Unnecessary Fields
Eliminate irrelevant columns or fields that are not needed in the CRM system to avoid clutter.
Check for Inactive or Old Data
Identify and remove outdated or inactive leads and contacts that are no longer relevant.
Ensure No Special Characters or Formatting Errors
Remove unnecessary special characters, extra spaces, or formatting inconsistencies that could cause issues during import.
2. Access the Upload Feature
Once logged into CRM as a Service, locate the toolbar at the left of your screen. Click on the Ellipsis (three-dot) icon to open the options menu and click on the Import menu item.

3. Upload your file
Click on the Import button. A file explorer window opens. Locate your data file and click open. Make sure your file is either in Excel (.xlsx) or CSV (.csv) format.

4. Configure Field Mapping
You will be prompted to map the columns in your spreadsheet to the corresponding fields in CRM as a Service. Data in CRM as a Service is organized into the following entities: Organization, Contact, Lead, and Opportunity.
For example, you might map the "Company Name" column to the "Name" field under "Organization," and "Email Address" to the "Email" field under "Contact."
Accurate mapping is crucial to ensure your data is imported correctly and efficiently.

Configure Field Mapping for Lead/Opportunity
When mapping a Lead/Opportunity, you must map the required fields: Opportunity Stage (Opportunity only) and either Contact Name or Organization Name.

You’ll need to map it to the Organization Name and Contact Name fields, and they will automatically be linked to the Lead/Opportunity.

Multiple Entries (Tags and Followers)
In CRM as a Service app, some fields—such as Tags and Followers—can hold multiple entries. However, during import, it is not possible to map multiple entries. You’ll need to add them manually from within the app after the import.

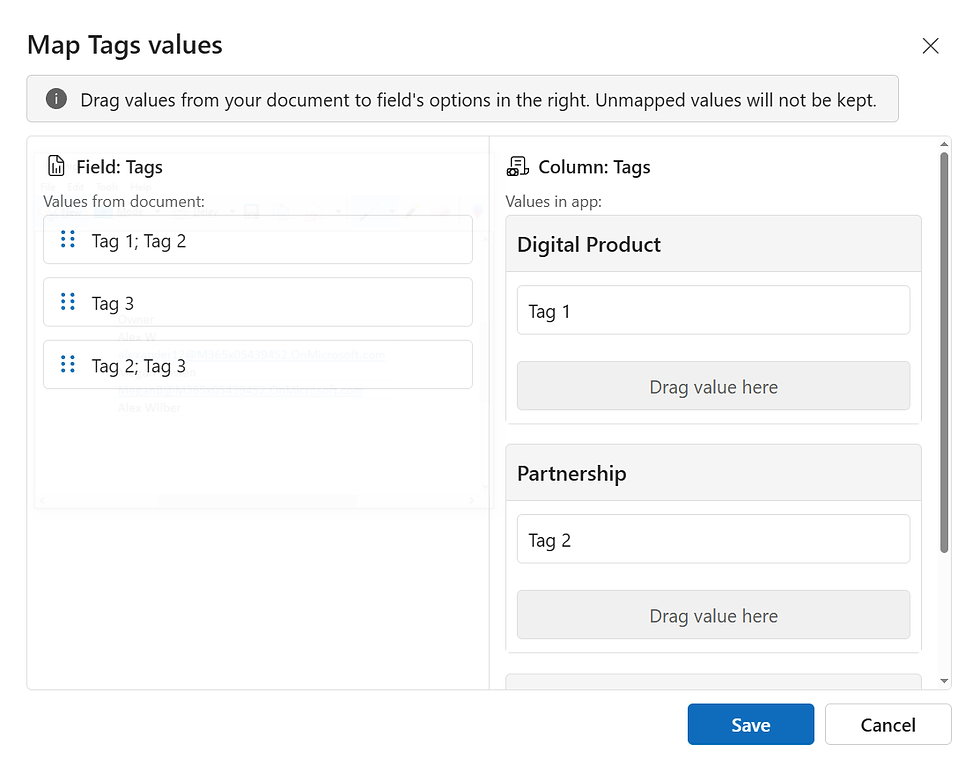
How to Import Data into Multiple Choice Custom Fields
Sometimes, your customer data includes fields where you need to select one of several pre-defined options. Importing data into these Multiple Choice Custom Fields requires a small amount of setup to ensure correct mapping.


Once your fields are mapped, click the Next button to move forward with the import.
Mapping Entity Owner Value
You don’t need to use a specific format for the entries in your file—the system is flexible and will handle the data appropriately. The entity owner is all members within the app, including the CRM owner.


Once your fields are mapped, click the Next button to move forward with the import.
Mapping Entity Collaborator Value
For larger teams, you need to ensure imported records are assigned to the correct salespeople or team members immediately. CRM as a Service allows you to map Collaborator values during the import process, connecting the record to a user in your system. The collaborators is all members within the app, including the CRM owner.

5. Preview Your Data
Before finalizing the import, you'll be presented with a preview of your data. Review the data to make sure everything looks correct. Verify that all columns are mapped properly and that no information is missing.
In case of duplicate data, you can choose whether to duplicate or merge it.

6. Confirm Import
After confirming that everything is in order, click the Finish button. Your data will now be successfully imported into CRM as a Service and ready for you to manage. The import process may take several minutes. You can return later to check if the upload has completed. Once finished, your data will be ready for you to manage.
By following these simple steps, you can easily upload your data into CRM as a Service. Whether you have a few records or hundreds, this feature makes data management efficient and hassle-free.
Ready to streamline your workflow? Try our CRM app today and experience the difference first-hand!
TeamsWork is a Microsoft Partner Network member, and their expertise lies in developing Productivity Apps that harness the power of the Microsoft Teams platform and its dynamic ecosystem. Their SaaS products, including CRM as a Service, Ticketing as a Service and Checklist as a Service, are highly acclaimed by users. Users love the user-friendly interface, seamless integration with Microsoft Teams, and affordable pricing plans. They take pride in developing innovative software solutions that enhance company productivity while being affordable for any budget.