Connect Ticketing as a Service to Microsoft Copilot
- Marc (TeamsWork)

- 3 days ago
- 6 min read
Updated: 1 day ago
Ticketing as a Service has an open REST API that lets you connect it to AI tools and work with your ticket data from a natural language conversation. Ask your agent to pull up tickets, summarize your workload, or create a new request directly from chat. This guide uses Copilot Studio as the example. You can also check out Connect CRM as a Service to Claude.
In this guide, you will import the Ticketing as a Service OpenAPI file into Microsoft Copilot Studio, publish a Ticketing tool, add it to a Copilot agent, and open the agent in Microsoft 365 Copilot.
What You Can Ask Copilot
After the tool is connected, users can ask Copilot questions such as:
List the newest open tickets.
Summarize the current ticketing workload and show what needs attention first.
Create a ticket for a new request.
See the demo snippet:
You can do more depending on which Ticketing as a Service API actions you choose to expose in Copilot Studio.
Before You Start
You will need:
Ticketing as a Service API key (you can see how to get it on the TeamsWork Ticketing API Reference page)
Access to Microsoft Copilot Studio
Ticketing as a Service OpenAPI JSON, available for download on the TeamsWork Ticketing API Reference page
Download the OpenAPI Specs JSON and save a copy, for example:
ticketing-api-copilot.jsonBefore uploading it to Copilot Studio, make sure the OpenAPI file points to only one production base URL for your Ticketing as a Service region.
In the JSON file, search for `servers`, then keep only the server object that matches your region:
For example, the downloaded file may include multiple servers:
{
    "servers": [
        {
            "url": "https://teamswork.azure-api.net/ticketing/v1",
            "description": "Production - Global (US)"
        },
        {
            "url": "https://ticketing-apim-eu.azure-api.net/ticketing/v1",
            "description": "Production - EU (EMEA)"
        },
        {
            "url": "https://ticketing-apim-aus.azure-api.net/ticketing/v1",
            "description": "Production - APAC (AUS)"
        }
    ]
}
For a Global / US instance, delete the EU and APAC entries so the file keeps only the Global / US server:
{
  "servers": [
    {
      "url": "https://teamswork.azure-api.net/ticketing/v1",
      "description": "Production - Global (US)"
    }
  ]
}
If you are not sure which region your Ticketing as a Service instance uses, confirm it in your TeamsWork settings before continuing.
Step 1: Create a REST API Tool
Sign in to Microsoft Copilot Studio. Make sure you are in the correct environment, then open Tools from the left navigation.

In Tools, click New tool, then choose REST API.


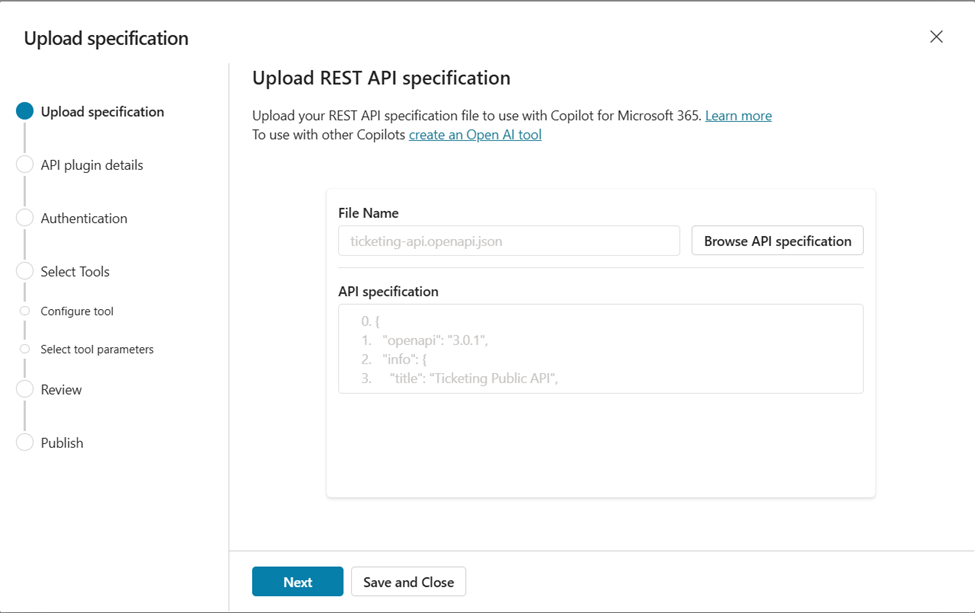
Step 2: Upload the Ticketing as a Service OpenAPI File
Upload the adjusted OpenAPI JSON file. After the file is accepted, continue to the next step.
Step 3: Enter the Tool Details
On the API plugin details screen, complete the basic setup:
Tool name: use a clear name such as `TeamsWork Ticketing API`
Description: describe what the tool lets Copilot do, such as Connects Copilot to Ticketing as a Service so it can retrieve and work with ticket data through the Ticketing API.
Solution: select an existing solution or let Copilot Studio create one
After you enter the tool name, Copilot Studio may briefly show Saving.... Wait for it to finish before continuing.

Troubleshooting: If you see "There was an error saving your tool. Please try again," it usually means the tool name collides with an existing tool, or the environment hit a transient save error. Try a slightly different, unique tool name, optionally pick an existing Solution, and click Next again. Tools that already exist can still be opened and edited normally from the Tools list.
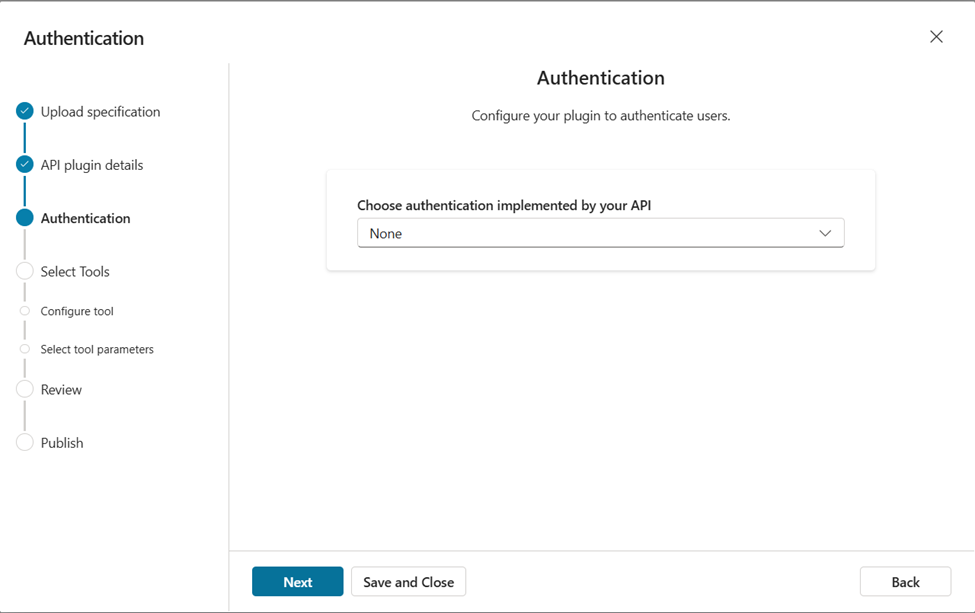
Step 4: Review Authentication
If Copilot Studio shows an Authentication step, leave it as None and continue.
The Ticketing as a Service API uses a key query parameter instead of a built-in authentication scheme, so you provide the API key later as a tool input (see Step 10), not here.
Step 5: Select Ticketing Actions
Choose the Ticketing as a Service API action you want Copilot to use.
For the first setup, start with a read-only action such as Get all tickets. This lets you test the connection and ask Copilot to list, search, or summarize tickets before adding actions that create or update data.
After this first action works, you can edit the same tool to add more Ticketing as a Service actions. See Adding more Ticketing actions later.

Step 6: Configure the Tool
Review the tool name and description, then continue.
The description is imported from the OpenAPI file. If Copilot Studio shows a blank required description, fill it in before continuing.

Step 7: Review the Parameters
Review the parameters for the selected action, then click Next.
For Get all tickets, the most important parameter descriptions are:
key: your Ticketing as a Service API key
timezone: your UTC offset, such as `7` for UTC+7
limit: the maximum number of tickets to return
optional filters such as status, search, or date filters
These are descriptions that help Copilot understand each parameter, not the actual values. This step does not have a field for the API key or timezone value. You set the real key and timezone later, on the tool inside your agent (see Step 10), and Copilot fills the remaining filters at runtime based on what the user asks.
If Next is disabled, check for blank required description fields and fill them in.

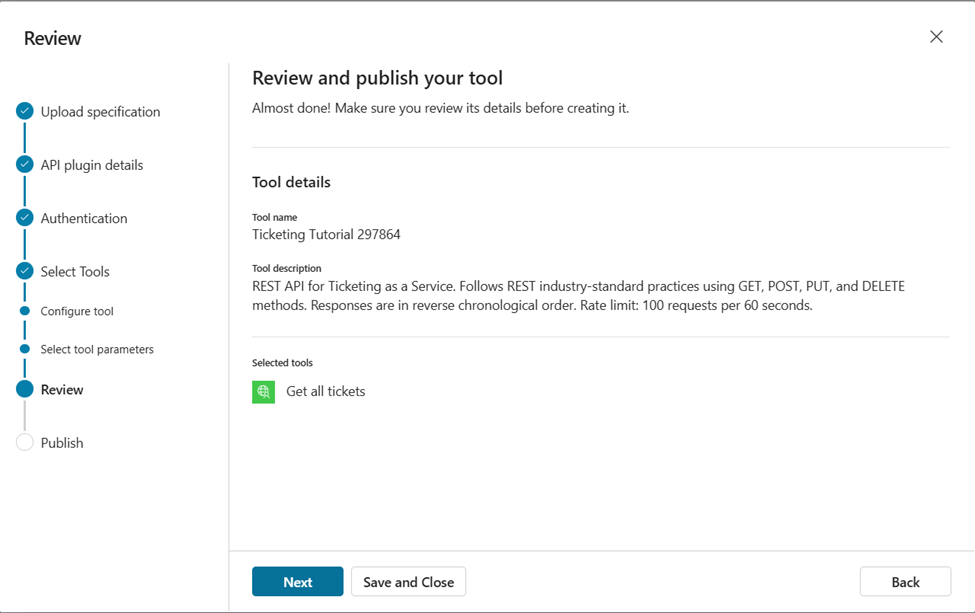
Step 8: Review and Publish
Review the selected action and tool details. When everything looks correct, publish the tool.
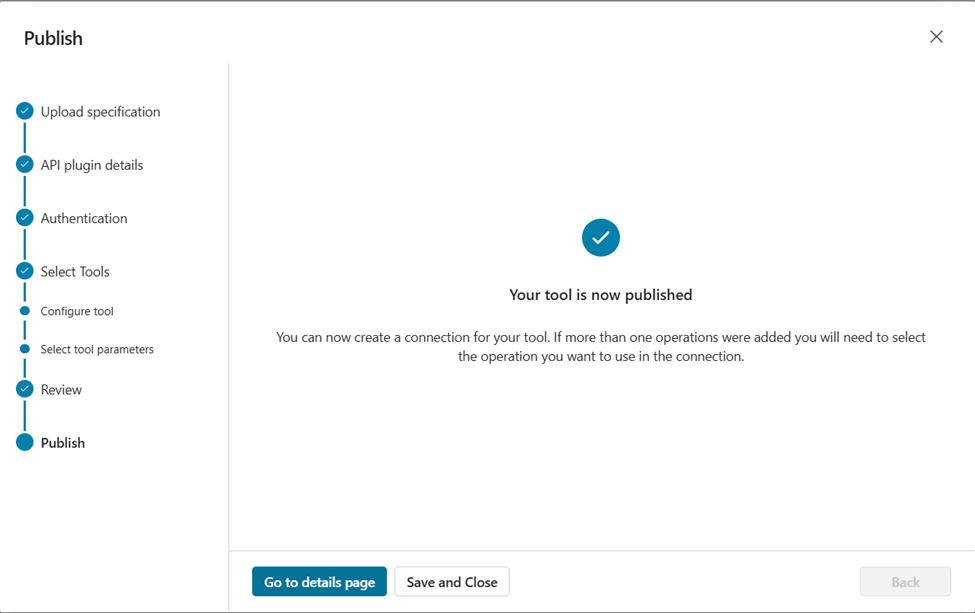
Step 9: Add the Tool to Your Agent
From the tool details page, click Add, then choose the agent that should use the Ticketing as a Service tool.

Step 10: Set the API Key and Timezone
This is where you provide the actual values the Ticketing as a Service API needs to run. They are set on the tool inside your agent, not in the tool wizard.
Open your agent, go to Tools, and open the Get all tickets tool. Expand Inputs. Each input has a Fill with AI / Custom switch:
key: switch to Custom and paste your Ticketing as a Service API key.
timezone: switch to Custom and enter your UTC offset, such as `7` for UTC+7.
Then click Save. Values set to Custom are applied every time the tool runs, so users never have to type the API key in chat.

Alternatively, you can leave an input on Fill with AI so Copilot supplies it at runtime. It may ask the user for the value the first time. For the API key, Custom is recommended so the key never appears in chat. Keep your API key private and do not paste it into prompts or screenshots.
Step 11: Publish the Agent and Open It in Microsoft 365 Copilot
After adding the tool, open your agent and click Publish. This makes the latest tool setup available to the agent's connected channels.
Then open Channels.

Under Microsoft channels, choose Microsoft 365 and Microsoft Teams.
Make sure Make agent available in Microsoft 365 Copilot is selected, then click See agent in Microsoft 365.

Step 12: Try It in Copilot Chat
In Microsoft 365 Copilot, search for your agent in Agent Store, then click Open.

Try prompts like:
Show me the top tickets to handle first.
Summarize our open tickets.
Create a new ticket for a laptop issue.
If Copilot asks you to connect first, open Connection manager, connect the Ticketing as a Service API connection, then retry the prompt.

If you set key and timezone to Custom values in Step 10, Copilot already has what it needs and runs the action directly. If you left them on Fill with AI, Copilot may ask you for them the first time:
key: your Ticketing as a Service API key
timezone: your UTC offset, such as `7` for UTC+7
After the tool runs successfully, Copilot uses the returned ticket data to answer in chat.
Small Notes
Start with read-only actions first, such as getting all tickets or reading one ticket. After those work well, add actions that create or update tickets.
Keep your API key private. Do not include it in screenshots, documentation, shared prompts, or public examples.
Adding More Ticketing Actions Later
You do not need to start over to add more actions. From Tools, open your Ticketing as a Service tool and click Edit, then go to the Select Tools step. Your current action shows under Selected tools, and the rest of the Ticketing as a Service API operations appear under Available tools, for example Create a ticket, Get a ticket, Update a ticket, Update ticket status, and Get ticket activities. Select the ones you want, continue through Review, and publish.

After publishing, open each new action in your agent and set its key and timezone inputs to Custom the same way as in Step 10.
Conclusion
You now have a Copilot agent that can answer ticketing questions from chat. Ticketing as a Service by TeamsWork is built with an open API so your team can connect it to the AI tools you already use, and get ticket information directly from a Copilot conversation without switching apps. Start with one read-only action, confirm it works, then add more actions based on how your team wants to work with Ticketing as a Service.
TeamsWork is a Microsoft Partner Network member, and their expertise lies in developing Productivity Apps that harness the power of the Microsoft Teams platform and its dynamic ecosystem. Their SaaS products, including CRM as a Service, Ticketing as a Service and Checklist as a Service, are highly acclaimed by users. Users love the user-friendly interface, seamless integration with Microsoft Teams, and affordable pricing plans. They take pride in developing innovative software solutions that enhance company productivity while being affordable for any budget.


Comments