Connect CRM as a Service to Claude
- Marc (TeamsWork)

- 10 hours ago
- 6 min read
TeamsWork CRM as a Service connects to AI tools through its open REST API, which means you can work with your CRM data directly from whichever AI assistant your team already uses. We have already shown how to bring TeamsWork into Microsoft Copilot in Connect Ticketing to Copilot.
This guide shows how to set it up with Claude so you can search contacts, summarize leads, and update records from a single conversation without writing any code.
How It Works
AI tools like Claude Code and Codex can connect to an application through MCP (Model Context Protocol), a standard way to give the assistant access to an app. Instead of building that connection by hand, you give the assistant the CRM API's description file and ask it to build the connection. You do not write any code yourself; the assistant builds it, only needs your API key, and runs locally on your computer so your data stays with you.
Before You Start
You will need:
Claude Code installed and signed in (or Codex). It runs on Windows, macOS, and Linux, in the terminal or as the VS Code or JetBrains extension. This guide works with any of them, and the main path does not require you to use a terminal.
the CRM OpenAPI files, from the TeamsWork CRM API Reference
your TeamsWork CRM API key
The connection is a small Python program built with a helper called FastMCP. You need Python installed. You do not install FastMCP yourself: the assistant adds it while it builds and then gives you the exact command to start the connection.
Set up the project folder. Make a folder for this work and put the four CRM OpenAPI files in an api subfolder. To get your API key, open your CRM app and go to Settings, then the API key section. A typical layout looks like this:
your-project/
└── api/
    ├── crm-cases.openapi.json
    ├── crm-directory.openapi.json
    ├── crm-history.openapi.json
    └── crm-pipeline.openapi.json
Keep the key private. You will provide it to the connection as an environment value, not by pasting it into chat.
Choose your region before you run the prompt. The prompt below uses the US endpoint by default. If your CRM is in the EU region, edit the base URL in the first bullet of the prompt (both the US and EU URLs are written there) before you send it.
Step 1: Open Claude Code in Your Project Folder
Open Claude Code in the folder that contains your api subfolder, so it can read the CRM specification files.
If you use Codex instead, open Codex in the same folder. The steps are the same; only how the connector is registered differs, which Step 3 covers (Codex uses its own config file, not Claude Code's).
Step 2: Enter the Prompt
A reminder before you paste: the prompt defaults to the US region. If your CRM is in the EU, change the base URL in the first bullet first.
Read my TeamsWork CRM OpenAPI files in ./api (cases, directory, history, pipeline) and build one local MCP server (FastMCP, Python, stdio) that wraps all four; fix any schema errors first.

- Auth and region from env, never hardcoded: send the key in the `Ocp-Apim-Subscription-Key` header from CRM_API_KEY; use https://crmaas-rest.azure-api.net/v1 by default (EU: https://crmaas-rest-prod-eu.azure-api.net/v1), overridable via CRM_BASE_URL.
- Support read and write (search, read, create, update, status and stage changes) for contacts, organizations, leads, opportunities, cases, and activities. Before any create, update, delete, merge, or bulk action, summarize it and ask me to confirm.
- Make task-oriented tools, not one per endpoint; keep output lean by default with full detail on request, capping large lists and supporting paging; and where the spec has empty descriptions, write clear ones.

Then set up the connection the way you load MCP servers, no terminal needed: for Claude Code write a `.mcp.json` in this folder, for Codex add the server to your config.toml, with a CRM_API_KEY placeholder in the env section. Don't ask for my key or run anything. Then tell me how to finish.
Optional: Try a Read-Only Demo First
If you would rather try a smaller version before enabling the full set, this prompt builds a read-only server that covers the essential read operations.
Build a local MCP server (stdio, FastMCP/Python) that wraps my TeamsWork CRM OpenAPI files in ./api. For this demo, expose READ-ONLY tools for the essentials: search and read contacts, organizations, leads, opportunities, and cases, plus recent activities. Send the API key in the `Ocp-Apim-Subscription-Key` header from the CRM_API_KEY environment variable. Use the US base URL by default (CRM_BASE_URL to override). Keep output lean. If a spec file has a schema error, fix it first. Then set it up the way you load MCP servers (a `.mcp.json` for Claude Code, or config.toml for Codex) with a CRM_API_KEY placeholder. Do not ask me for my key or run anything. Then tell me how to finish.Step 3: Add Your Key and Connect
Claude has already written the connector and the file that registers it; you only add your key and restart. Your key never goes in the chat, only in that file, where Claude left a placeholder. This works the same in the terminal, the VS Code or JetBrains extension, or the Claude Code desktop app.
Claude Code uses .mcp.json in your project folder:
{
  "mcpServers": {
    "crm": {
      "command": "python",
      "args": ["/path/to/your-project/server.py"],
      "env": { "CRM_API_KEY": "your-crm-api-key-here" }
    }
  }
}
Codex uses its own config.toml instead (it does not read .mcp.json):
[mcp_servers.crm]
command = "python"
args = ["/path/to/your-project/server.py"]

[mcp_servers.crm.env]
CRM_API_KEY = "your-crm-api-key-here"
Replace only your-crm-api-key-here with your key; everything else is already filled in. (EU region: add a CRM_BASE_URL line next to CRM_API_KEY in the env section, set to https://crmaas-rest-prod-eu.azure-api.net/v1.) Keep the file private. Then restart your assistant once; the first time, Claude Code asks you to approve the connector, so say yes.
Step 4: Start Working
That is the whole setup. After the restart in Step 3, the connector is live in Claude Code, so you can work with your CRM in plain language right here, with no further steps. Ask it to find leads, summarize a contact, review open opportunities, or update a record. For anything that changes data, the assistant first summarizes the change and asks you to confirm, so you stay in control.
Optional: Use It in Claude Chat on the Desktop App
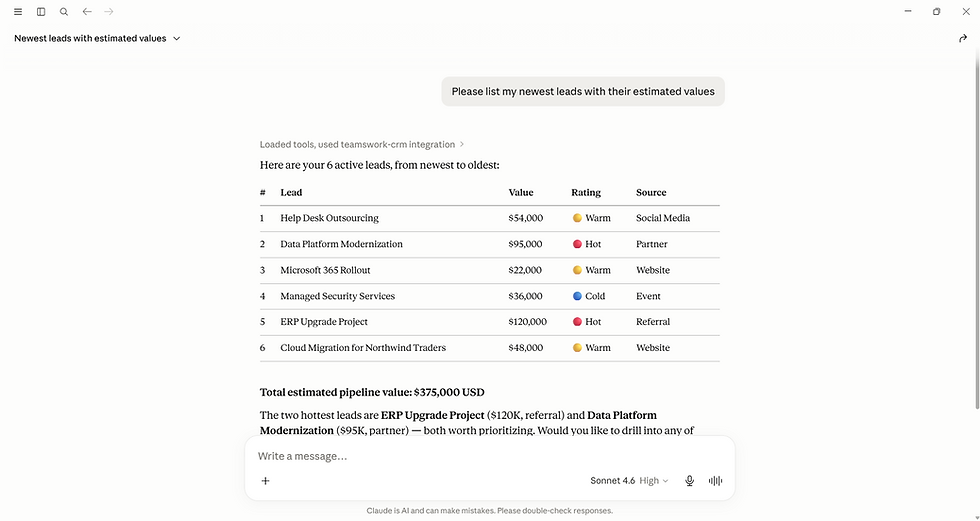
Optional, and separate. You are already done after Steps 1 to 4. This part is only if you also want to chat with your CRM in Claude chat on the desktop app, which is a different product from Claude Code and keeps its own list of connectors. Nothing above carries over to it, so you add the same connector there once, in its own config file. Skip this if you only use Claude Code. (Image 4 below shows the result in Claude chat.)
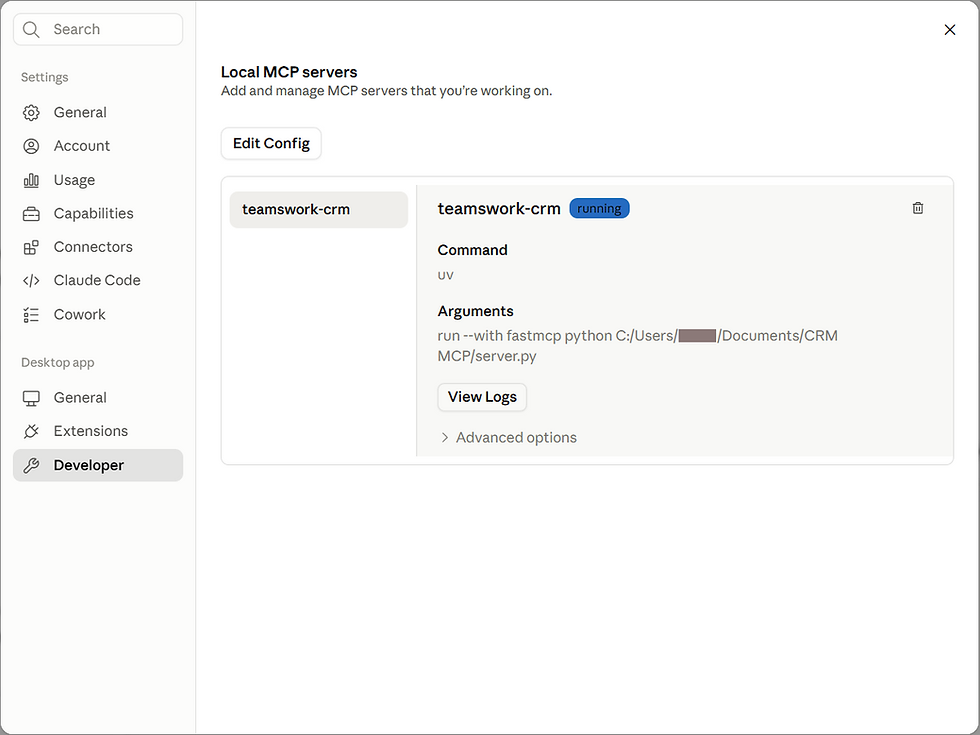
1. Open Claude Desktop, go to Settings, then Developer, then Edit Config. This opens claude_desktop_config.json (on Windows it lives in %APPDATA%\Claude\; on macOS in ~/Library/Application Support/Claude/).

2. Add your connector under mcpServers. If the file is empty, the block below is the whole file. If it already has other entries (such as coworkUserFilesPath or preferences), add mcpServers as one more entry, separated by a comma, and leave the rest untouched:
{
  "mcpServers": {
    "teamswork-crm": {
      "command": "uv",
      "args": ["run", "--with", "fastmcp", "python", "/path/to/your-project/server.py"],
      "env": { "CRM_API_KEY": "your-crm-api-key-here" }
    }
  }
}
Replace the path with the full path to your server.py, and your-crm-api-key-here with your key (for EU, also add "CRM_BASE_URL": "https://crmaas-rest-prod-eu.azure-api.net/v1"). Match command and args to the start command Claude gave you: the screenshots here use uv, but if yours uses python, set "command": "python" and "args": ["/path/to/your-project/server.py"]. The example below shows mcpServers added at the top of a config that already had other settings, with a comma after it:

3. Save, then fully quit and reopen Claude Desktop. Under Settings, Developer your server now shows as running:
4. Start a new chat and ask away. Claude uses the CRM connector and answers from your data:
One limit to know: claude.ai in a web browser and the Claude mobile app cannot use a local connector like this one. Those need a hosted version, which is a separate topic.
Notes
Your data stays local. The connector runs on your computer, and your CRM data and key are not sent to a third party.
Choose your region by setting the base URL in the prompt (US by default, EU available) or CRM_BASE_URL.
Keep your API key private. Provide it only as the environment value, never in a prompt or screenshot.
The same approach works for other TeamsWork apps. You can point Claude at another TeamsWork API the same way.
Conclusion
You have given Claude a safe way to work with your CRM in natural language, set up by asking rather than configuring. Start with read operations to get comfortable, then allow the assistant to create and update records, confirming each change as you go.
TeamsWork is a Microsoft Partner Network member, and their expertise lies in developing Productivity Apps that harness the power of the Microsoft Teams platform and its dynamic ecosystem. Their SaaS products, including CRM as a Service, Ticketing as a Service and Checklist as a Service, are highly acclaimed by users. Users love the user-friendly interface, seamless integration with Microsoft Teams, and affordable pricing plans. They take pride in developing innovative software solutions that enhance company productivity while being affordable for any budget.

Comments